 |
| One of the most popular ways to organize a kitchen is to start with a good drawer divider system |
Learning how to organize a kitchen not only ensures that your kitchen is consistently neat and tidy, but also helps to streamline kitchen activities. Regardless of whether you have just moved into a new house or want to improve the functionality of your current kitchen, we believe these tips will help.
One of the most popular ways to organize a kitchen is to start with a good drawer divider system
1. Dispose of Clutter: Donate or discard anything that you are no longer using in the kitchen. You can hand it down to a relative, donate it to charity, or sell it on eBay or at a yard sale. While some of the cookware in your kitchen may have some sort of sentimental value to you, be sure to weigh how much you use it versus how much space it consumes. For example, when did you last use the cookie press? Is the melon baller gathering dust? Do you use all the gizmos in your kitchen? Getting rid of kitchenware that you no longer use will create space for the items you really use. If you want great de-cluttering ideas and inspiration, read Clutter's Last Stand by Don Aslett.
2. Go Shopping: If there is broken kitchenware, replace it with cookware that is functioning. For example, if the fry pan keeps scorching your delicate dishes, replace it with a non-stick fry pan. If you do not have the money to replace the kitchenware, include it in your birthday or anniversary request list.
3. Sort Smarter: Keep utensils that are frequently used in an area that can easily be reached. For instance, you can have a cupboard for keeping utensils that are rarely used and shelves for keeping cookware that is frequently utilized. Then again, if you lack enough room in your kitchen to build shelves and cabinets, rarely used items can be kept in an protective container in the garage.
 |
| A pull-out spice rack is a great way to keep your spices organized in one place. |
4. Create Work Zones: Consider various centers of activities and keep related cookware close to one another. If you happen to be remodeling, consider building a pantry near the refrigerator to consolidate your food zones, adding a preparation area where meals are prepared before cooking, and a cooking area where the stove is to be placed with appropriate spices and utensils close by. Other zones to consider are a cleaning and waste disposal area as well as a baking and serving area. Creating these activity zones will streamline operations in your kitchen. Check out Blum Dynamic Space for more suggestions on ideal work zones, which are introduced in the video below:
Beyond the Work Triangle: After studying the workflow of kitchen users worldwide, Blum has developed a planning guide called DYNAMIC SPACE which aims to make kitchen tasks more comfortable, less time-consuming, and more ergonomic. The core of their solution begins with planning the kitchen in five zones: Consumables, Non-Consumables, Cleaning, Preparation, and Cooking.
5. Clear the Countertops: The kitchen counter is your main workspace. Do not forget to clean it in addition to removing clutter from it. How often do you use the appliances currently taking up space on the countertop? Is the mixer, toaster oven, rice cooker, or juicer collecting dust? If you any of your countertop appliances infrequently, consider storing them in a nearby cabinet instead to be pulled out when needed.
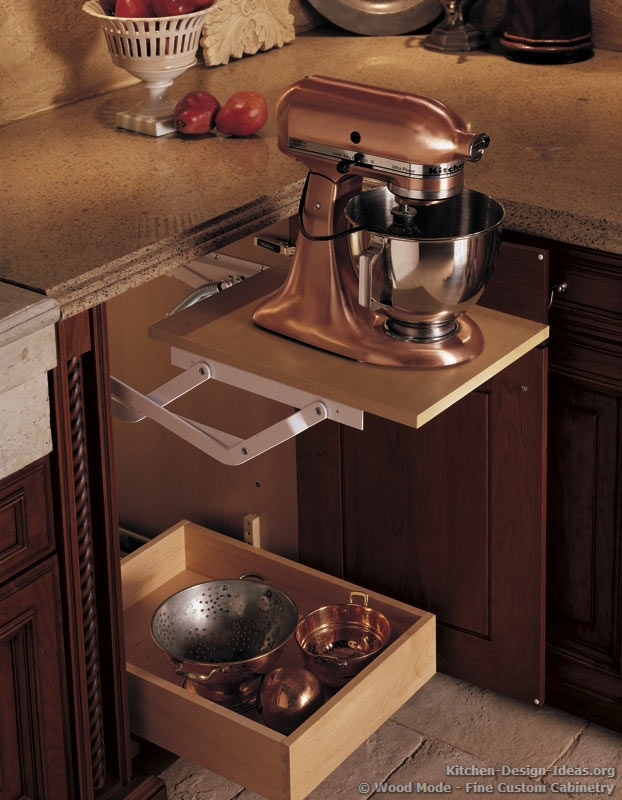 |
| Save counter space by storing your stand mixer in a base cabinet. This one is built onto a mechanized cabinet lift for frequent access |
7. Setup a Workstation: Do you use your kitchen when sending mail or helping your kids with homework? Do you find yourself reading the morning newspaper in the kitchen? If you find yourself using the kitchen for other activities besides cooking, make sure that there is a tidy location within your kitchen where you can sit and read a book or help your child with their homework. See this gallery of Kitchen Desks on Pinterest for more inspiration.

Kitchen Desk
An increasing number of families now use the kitchen for everyday tasks, from checking email to doing homework. If you plan to have a desk in your kitchen, be sure to keep it tidy. See more pictures of this kitchen.
8. Get a Tune Up: Your kitchen will not be at its optimum if there are broken or damaged components, such as leaking faucets or partially clogged drains. If something is broken in your kitchen, make a point of replacing or fixing it as soon as possible.
9. Sort by Frequency of Use: Ideally, an efficient kitchen basically boils down to having what you need at your fingertips. If there are items that you use on a frequent basis, you can keep them close to the area where they are most used, while lesser-used items should be placed in harder-to-reach areas.
10. Keep Tidy Habits: Finally, do not forget to clean the kitchen as you work. Once you are through with a pan, have it cleaned and stored away. This is the most productive habit to maintain. Cleaning as you work ensures that clutter does not pile up to unmanageable sizes in the kitchen.
For more inspiration, browse Dunelm Mill's kitchen storage department for a variety of other organizing options including bread bins, canisters, jars, and containers.


